Saturday, July 3, 2010

My 21st!

This year was my 21st and I had a party at home....


This is the cake that Mum and I made together.... I made the cream puffs, the roses and the ribbons and mum put it all together...


This was my nephew, Zac, and I at nearly 2am... he tried to stay up as long as the rest of us but fell asleep 1/2 an hour before us...

We found some giant sparklers (nearly a metre long) and had some fun... After convincing my nephew that they were safe he touched he hot part seconds after it stopped burning and burnt himself....

These were some of the decorations I made for the 'chandelier and tiaras' theme...

This was the morning after and Mum and Dad gave me their present.... A LAPTOP!!! I've wanted one for soooo long....

And here it is... A nice new shiny red laptop...

This was the day of my actual birthday and Dad's at the pizza oven keeping it going like it had been all weekend...

And blowing out the candles on my second cake.... a freddo ice-cream cake :D

I had so much fun that whole week (as well as being a bit stressed before it)... and... I'm 21!


Birthday Cards


Last night I made a 'title' for a big photo frame I got for my birthday so that I can put some birthday pictures into it....
Then I was thinking about my nieces 6th birthday party this weekend and decided to use the same design for her birthday card...


And had some metallic stuff left so I did the envelope too....


Hopefully she like it :)

Monday, April 26, 2010

Wednesday, February 24, 2010

Dark Angels - Warhammer 40K


I paint my boyfriends Dark Angels army. I like some of them... others aren't as precise... but they're OK. the sword with the wings is the logo of the Dark Angels, hence why they're everywhere, and the numbers are the groups they belong to.


This last photo is a custom model I made from some extra bits and pieces. I used the upper body of a Dark Angel, and made his legs from polymer clay. I snipped off the end of the sword, as well as most of the arm, which belongs to a Ultramarine. The knife lying next to the Dark Angel was his weapon, but his last movement was slicing the Ultramarines hand, then he let go of the knife and it flew to its resting position. I ended up painting the base (blue in the photo) a slate colour as not to distract from the scene. I had fun making the blood from super glue and craft glue, before painting it.

Hope you enjoy :)

Wednesday, February 10, 2010

Angel Tote Bag

This was a bag I made about 2 years ago. I made it because I found some printed canvas type material at spotlight and it made me want to make one... so I did.

Its made of 2 rectangles and one long strip to make the width of the bag, and then some skinny strips for the handles. I embroidered "Angel" in the corner as it make part of my screen name. I added some little beads and things and later on I added some of my masses of badges.

Its a very handy bag, and a good size for books, pencil cases and notes. You could even make one with padding and a zip at the top as a laptop case. If you get a good print of fabric, its stylish enough to carry as your normal bag, and versatile enough to use as a reusable shopping bag that you can throw in the wash if something leaks.

Unfortunately this bag has been missing in action since I moved house... Ive still got boxes to unpack that I have no room for... and I have no idea what is in them... Hopefully my bag!

Thursday, February 4, 2010

A Day at the Park


(a lady eating her lunch under two trees)


I spent a day at the park yesterday while my boyfriendwas at work and we had lunch together. I played DS, took some photos and drew some things on a scrapbook I got at officeworks thats just around the corner from the park. My boyfriends camera only tells you that its dying when its practically dead, which means i thought it was full of battery and its said it was dead onlya few minutes later. Alot of my photos were taken through the view finder, the old fassion way, because the screen turned off. Ill share some of my photos, I cant take photos of my drawings yet because the camera is still dead.

(a plant growing out of another tree)

(mens toilet sign)


(a couple of seagulls)


(a screw in a park bench)

(the lawn mower)

(my sandle)

I had a great day, had great food from MYO, but i got sunburnt... never go out to the park all day without sunscreen!

Saturday, January 30, 2010

Wrath of Fenrir - Mike's Face

I did the face painting of Mike (lead singer) of Wrath of Fenrir for their photoshoot.

This photo wasn't taken by me... it was taken by Tim Masih... and I have a Flicker link.

I didn't do the lines on Mike or the rest of the band... but I did paint his face. A grey-white base and black details on top. They had their first gig about 2 hours ago but unfortunately I couldn't be there but my boyfriend said they did really well. :)

Monday, January 25, 2010

The Stingray Block's Stingray

I did this at the school Mum is teaching at about a year ago. The year 4-7 block was called the stingrays, hence the animal I made. We had some fun trying to attatch this to the roof of the middle area... as you might tell...


It was alot of drawing and cutting and painting and sewing... but it was also alot of fun. I made a mini stingray too, but he's still at school and I haven't taken a photo of him yet. This one is about 2m wide and 2.5m-3m long with his tail. He has bulging eyes and indents above his eyes. He has a painted mouth and gills?... I think they're gills... on his under side and lots of those white spots on the top. I added glitter on the spots and the black lines underneath to add a little magic to him for the kids. I can't put photos ofthe kids up here, not even the ones that helped put it up... but there is a photo of the stingray and myself to show you how big he is... and because I was proud of him. :)

Wednesday, January 13, 2010

Dia De Los Muertos 2008

This was a mural I designed and painted for a friends Dia De Los Muertos party, complete with sequins.

I really like how it finished up with the candles surrounding the skull and the band at the bottom. The roses in the eye sockets were hard to try and get symmetrical, but the whole project was still fun.

This was a little guitar playing skeleton I painted for people to stick their heads through. While I still think the yellow surrounding him was a good colour choice, it sort of looks like a holy thing... which is still kind of kewl.

I had fun making these, I'm pretty sure the people at the party had fun with these, and hopefully you enjoy looking at them. :)

If you would like a mural custom made for your party, wall or event, feel free to email me at jade.lavery @ gmail.com (without the spaces)

A New 2010!

My goal for this year is to keep this blog up to date because I haven't been and I need to... Simple I guess. I haven't been doing a lot over the summer craft wise so I'm going to start sharing some of my older projects and photos.

This was me at Christmas... Festive hair and festive shirt... A very hectic but very enjoyable day.

Have a happy 2010!

Thursday, September 24, 2009

Hand Painted and Home Sewn Backpack


This is a backpack that I painted and sewed. The otherside is painted as well, but I don't have a photo and it's still packed away in a box from moving house. This backpack is very handy and is just over a A4 size so its perfect for carrying books. Its amazing the amount of stuff you can fit in there. I went for alot of random things, and I like it.

If you would like one of these custom made for you, feel free to email me jade.lavery @ gmail.com (without the spaces)

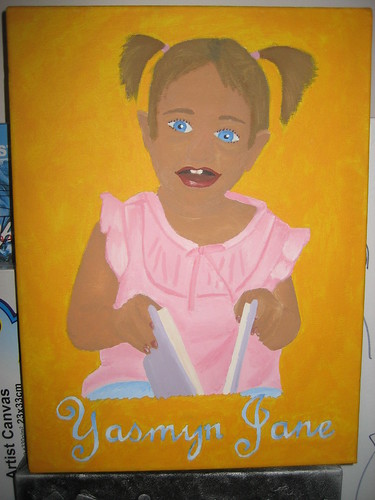
Yasmyn Jane Portrait


This is a painting of my niece that I did. The face isn't the best, but I still Like it.


This is a photo of my niece last christmas, after when I did the painting of her. Her eyes aren't so bright blue and her lips aren't so red, but its just practice and learning for next time :) . This painting now lives in the kids room at my house (the Grandkids room at Mum and Dads house)

Tuesday, September 22, 2009

Life on Canvas


This is a canvas I made a few years ago to represent my life at that time.

How to make your own:
1. Choose things to go onto your canvas and arange them.
2. Glue everything onto your canvas.
3. Make a mix of water and PVA glue (1:1) and cover everything in it, then in a layer of 1 ply toilet paper. (Note: you can just seperate the plys of the paper you have in your house). Use a brush covered in the PVA mixture to push the paper into all the little spot so that you can still see the details.
4. Repeat 2-3 times.
5. Give everything a coat of black paint. (possibly 2 depending on the coverage) After its dry, look at it from every angle to spot any hidden spots that didnt get painted.
6. get a sponge or a old rag (not tissues because they stick) and dab it in silver paint. Dab it on a spare piece of paper/plastic until theres almost none, then dab it onto your canvas. Keep going until every raised piece is covered, or your happy with it. (Note: having next to none on the sponge makes all the raised details visible on the canvas.)

I used a variaty of things on mine that I thoguht reflected me at the time. In the classroom I've set this up as an art activity to show communication on a piece of card rather then a cavas. This could be used for almost anything.


Sunday, September 20, 2009

Introduction

My name is Jade Lolita and I've been thinking about doing this for a long time now and, thanks to inspiration from a friend, I finally did.
I'm hoping to make this about arts and crafts that I create or find. I would also like to share some photos with you, and I'd appreciate any comments.

I have heaps of stuff to post that I've already made and hopefully alot more to make and post in the future.